AndroidNativeEmu和unidbg对抗ollvm的字符串混淆


题目出自3w班12月题——对抗字符串混淆。
字符串混淆在保护中是很常见的一个手段,熟练使用unicorn能轻松的解决曾经实现起来非常复杂的问题。
AndroidNativeEmu和unidbg都是对unicorn进行了一定程度封装的开源项目,让我们可以很方便的调用jni函数,以及对没有实现的函数进行hook实现处理,并且让我们可以实现so里面模拟调用java函数。
下面首先使用AndroidNativeEmu来对抗ollvm的字符串混淆,对so进行修复,让我们可以更加便捷的进行静态分析。
在实现之前,先总结下原理。
ollvm的字符串混淆,我们使用IDA的时候,看到的结果如下:

这里相当于是一个解密函数,通过这个函数将会还原成正常的字符串。然后我们看看在哪里调用到了这个解密函数。
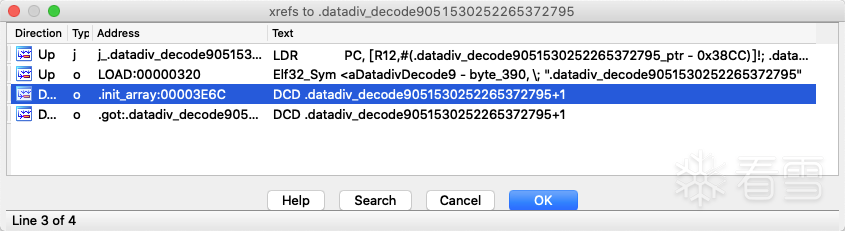
可以看到是在.init_array中使用解密函数对字符串进行还原。也就是说,当我们执行完.init_array后,就会将正常的字符串写入内存中,这时我们就得到了真正的字符串了。所以根据这个情况:
第一步,我们需要监控内存的读写,然后运行.init_array。这样发生的内存写入时,基本可以确定是字符串还原函数在写入恢复的字符串。
写之前我们先看看unicorn的内存写入的相关注释:
/*Callback function for hooking memory (READ, WRITE & FETCH)@type: this memory is being READ, or WRITE@address: address where the code is being executed@size: size of data being read or written@value: value of data being written to memory, or irrelevant if type = READ.@user_data: user data passed to tracing APIs*/
这里就知道了,size是写入或读取数据的长度,value是写入或读取的数据。那么开始写我们第一步的代码:
import loggingimport sysfrom unicorn import UC_HOOK_MEM_WRITEimport structfrom androidemu.emulator import Emulator# Configure logginglogging.basicConfig(stream=sys.stdout,level=logging.DEBUG,format="%(asctime)s %(levelname)7s %(name)34s | %(message)s")logger = logging.getLogger(__name__)def hook_mem_write(uc,type,address,size,value,userdata):curdata=struct.pack("I",value)[:size]print(curdata)emulator = Emulator(vfp_inst_set=True)emulator.load_library("example_binaries/libc.so", do_init=False)#设置内存的写入监控emulator.mu.hook_add(UC_HOOK_MEM_WRITE, hook_mem_write)#后面的do_init为true就会调用.init_arraylib_module = emulator.load_library("example_binaries/obf.so", do_init=True)
输出的结果如下:

这里能看到,真实的字符串已经能在回调监控中打印出来了。接下来的第二步,我们需要把所有真实字符串以及写入真实字符串的位置给保存下来。
dstr_datas={}def hook_mem_write(uc,type,address,size,value,userdata):curdata=struct.pack("I",value)[:size]dstr_datas[address]=curdataprint(curdata)
这样我们就将init_array过程中所有还原出来的真实字符串给保存下来了,最后我们要将我们的真实字符串再写回so中。
那么写回到哪里呢?我们监控内存写入时,当时是给什么地址写入数据,我们就写入到哪里,这样我们写入的so就能直接在IDA中打开就看到真实字符串了。
在写入时需要注意的是,我们保存的address是有一个基址的。也就是说,我们写入时需要减掉基址,才是真正应该写入的位置。
#获取到基址base_addr=lib_module.basesofile=open("example_binaries/obf.so","rb")#我们要将真实的字符串回填到sodata中。然后再保存sodata=sofile.read()for address,v in dstr_datas.items():#仅仅将so范围内的保存原字符串进行写回if address > base_addr and address < base_addr+lib_module.size:offset=address-base_addrprint("address:0x%x data:%s offset:0x%x" % (address, v,offset))
然后我贴上几行打印的内容:
address:0xcbc6a004 data:b'j' offset:0x4004address:0xcbc6a005 data:b'n' offset:0x4005address:0xcbc6a006 data:b'i' offset:0x4006address:0xcbc6a007 data:b'\x00' offset:0x4007address:0xcbc6a008 data:b'g' offset:0x4008
第一个offset的偏移是0x4004,那么我们打开IDA检查一下是否对的上:

能看到IDA里面显示的确实是对的上的。但是这里要留意最左下角的00003004,实际这个才是文件中的真实位置。所以我们这里直接写回so要再将offset-0x1000。下面我们开始将so的数据修改,并且保存成一个新的文件。最后贴上完整代码:
import loggingimport sysfrom unicorn import UC_HOOK_MEM_WRITEimport structfrom androidemu.emulator import Emulator# Configure logginglogging.basicConfig(stream=sys.stdout,level=logging.DEBUG,format="%(asctime)s %(levelname)7s %(name)34s | %(message)s")logger = logging.getLogger(__name__)dstr_datas={}def hook_mem_write(uc,type,address,size,value,userdata):curdata=struct.pack("I",value)[:size]dstr_datas[address]=curdata# print(curdata)emulator = Emulator(vfp_inst_set=True)emulator.load_library("example_binaries/libc.so", do_init=False)#设置内存的写入监控emulator.mu.hook_add(UC_HOOK_MEM_WRITE, hook_mem_write)#后面的do_init为true就会调用.init_arraymodulePath="example_binaries/obf.so"lib_module = emulator.load_library(modulePath, do_init=True)#获取到基址base_addr=lib_module.basesofile=open("example_binaries/obf.so","rb")#我们要将真实的字符串回填到sodata中。然后再保存sodata=sofile.read()sofile.close()for address,v in dstr_datas.items():#仅仅将so范围内的保存原字符串进行写回if address > base_addr and address < base_addr+lib_module.size:offset=address-base_addr-0x1000print("address:0x%x data:%s offset:0x%x" % (address, v,offset))sodata=sodata[:offset]+v+sodata[offset+len(v):]#保存成一个新的sosavepath=modulePath+".new"nfile=open(savepath,"wb")nfile.write(sodata)nfile.close()
那么实际效果怎么样呢,我们打开IDA来对比一下修改前和修改后的效果。
修改前:

修改后:

接着再使用unidbg来实现一次字符串的反混淆。
按照上面的思路,我们首先设置内存写入的监控,然后加载so。而unidbg在加载的时候,就会自动的执行init和init_array。所以我们接下来看看unidbg是怎么进行内存的写入监控的。搜索一下unidbg源码,就能找到是如何使用的了。我们搜索hook_add_new:

这里我们就知道了是设置了一个TraceMemoryHook对象进行监控的。由于我们是需要自己修改里面监控后的逻辑,所以不要变动他原有的。拷贝一份出来,然后删除里面原有的打印逻辑,再加上我们之前逻辑。也就是打印一下写入的数据,将监控到的写入数据和写入地址给保存起来。
class DeStrWriteHook implements WriteHook {private final boolean read;DeStrWriteHook(boolean read) {this.read = read;}PrintStream redirect;TraceWriteListener traceWriteListener;//保存的写入数据地址和写入的数据public Map<Long,byte[]> dstr_datas=new HashMap<Long,byte[]>();/*** long类型转byte[] (大端)* @param n* @return*/public static byte[] longToBytesBig(long n) {byte[] b = new byte[8];b[7] = (byte) (n & 0xff);b[6] = (byte) (n >> 8 & 0xff);b[5] = (byte) (n >> 16 & 0xff);b[4] = (byte) (n >> 24 & 0xff);b[3] = (byte) (n >> 32 & 0xff);b[2] = (byte) (n >> 40 & 0xff);b[1] = (byte) (n >> 48 & 0xff);b[0] = (byte) (n >> 56 & 0xff);return b;}/*** long类型转byte[] (小端)* @param n* @return*/public static byte[] longToBytesLittle(long n) {byte[] b = new byte[8];b[0] = (byte) (n & 0xff);b[1] = (byte) (n >> 8 & 0xff);b[2] = (byte) (n >> 16 & 0xff);b[3] = (byte) (n >> 24 & 0xff);b[4] = (byte) (n >> 32 & 0xff);b[5] = (byte) (n >> 40 & 0xff);b[6] = (byte) (n >> 48 & 0xff);b[7] = (byte) (n >> 56 & 0xff);return b;}@Overridepublic void hook(Backend backend, long address, int size, long value, Object user) {if (read) {return;}try {Emulator<?> emulator = (Emulator<?>) user;if (traceWriteListener == null || traceWriteListener.onWrite(emulator, address, size, value)) {//将写入的地址和写入的数据保存下来,先转long为小端序byte[] writedata=longToBytesLittle(value);byte[] resizeWriteData=new byte[size];//将指定大小的数据保存System.arraycopy(writedata,0,resizeWriteData,0,size);dstr_datas.put(address,resizeWriteData);}} catch (BackendException e) {throw new IllegalStateException(e);}}}
然后我们按之前的步骤,使用这个类来hook,并且遍历一下我们保存出来的结果看和AndroidNativeEmu是不是一致的:
public class DestrOllvm {private final AndroidEmulator emulator;public DeStrWriteHook trace;public Module module;public DestrOllvm(){emulator=new AndroidARMEmulator("com.example.unicorncourse08");try {trace = new DeStrWriteHook(false);final Memory memory=emulator.getMemory();LibraryResolver resolver = new AndroidResolver(23);memory.setLibraryResolver(resolver);emulator.getBackend().hook_add_new(trace,1,0,emulator);module=emulator.loadLibrary(new File("unidbg-android/src/test/resources/example_binaries/obf.so"));} catch (IOException e) {e.printStackTrace();}}public static byte[] readFile(String strFile){try{InputStream is = new FileInputStream(strFile);int iAvail = is.available();byte[] bytes = new byte[iAvail];is.read(bytes);is.close();return bytes;}catch(Exception e){e.printStackTrace();}return null ;}public static void main(String[] args){DestrOllvm destr=new DestrOllvm();String savepath="unidbg-android/src/test/resources/example_binaries/obf.so.new";byte[] sodata=readFile("unidbg-android/src/test/resources/example_binaries/obf.so");long base_addr=destr.module.base;long module_size=destr.module.size;//遍历保存的写入地址和写入数据for(Map.Entry<Long, byte[]> item : destr.trace.dstr_datas.entrySet()){//如果范围是在模块内的。则进行处理if(item.getKey()>base_addr && item.getKey()<base_addr+module_size){long offset=item.getKey()-base_addr-0x1000;System.out.println(String.format("address:0x%x data:%s",offset, OtherTools.byteToString(item.getValue())));}}}}
然后看看打印的结果和之前是不是差不多的:
address:0x3004 data:6Aaddress:0x3005 data:6Eaddress:0x3006 data:69address:0x3007 data:00address:0x3008 data:67address:0x3009 data:6Faddress:0x300a data:20address:0x300b data:69address:0x300c data:6E
对比AndroidNativeEmu的日志是正确的。那么我们完成最后的步骤,生成新的so文件。下面贴上完整代码:
public class DestrOllvm {private final AndroidEmulator emulator;public DeStrWriteHook trace;public Module module;public DestrOllvm(){emulator=new AndroidARMEmulator("com.example.unicorncourse08");try {trace = new DeStrWriteHook(false);final Memory memory=emulator.getMemory();//这里的android版本指定后会自动load相关的soLibraryResolver resolver = new AndroidResolver(23);memory.setLibraryResolver(resolver);//设置内存写入的监控emulator.getBackend().hook_add_new(trace,1,0,emulator);module=emulator.loadLibrary(new File("unidbg-android/src/test/resources/example_binaries/obf.so"));} catch (IOException e) {e.printStackTrace();}}public static byte[] readFile(String strFile){try{InputStream is = new FileInputStream(strFile);int iAvail = is.available();byte[] bytes = new byte[iAvail];is.read(bytes);is.close();return bytes;}catch(Exception e){e.printStackTrace();}return null ;}public static void writeFile(byte[] data,String savefile){try {FileOutputStream fos=new FileOutputStream(savefile);BufferedOutputStream bos=new BufferedOutputStream(fos);bos.write(data,0,data.length);bos.flush();bos.close();} catch (Exception e) {e.printStackTrace();}}public static void main(String[] args){DestrOllvm destr=new DestrOllvm();String savepath="unidbg-android/src/test/resources/example_binaries/obf.so.new";byte[] sodata=readFile("unidbg-android/src/test/resources/example_binaries/obf.so");long base_addr=destr.module.base;long module_size=destr.module.size;ByteArrayOutputStream baos = new ByteArrayOutputStream();//遍历保存的写入地址和写入数据for(Map.Entry<Long, byte[]> item : destr.trace.dstr_datas.entrySet()){//如果范围是在模块内的。则进行处理if(item.getKey()>base_addr && item.getKey()<base_addr+module_size){//获取到正确的写入的偏移位置baos = new ByteArrayOutputStream();Long offset=item.getKey()-base_addr-0x1000;System.out.println(String.format("address:0x%x data:%s",offset, OtherTools.byteToString(item.getValue())));//先把前半部分取出来byte[] start=new byte[offset.intValue()];System.arraycopy(sodata,0,start,0,offset.intValue());//然后把后半部分的大小计算出来int endsize=sodata.length-offset.intValue()-item.getValue().length;//把后半部分的数据填充上byte[] end=new byte[endsize];System.arraycopy(sodata,offset.intValue()+item.getValue().length,end,0,endsize);//将三块位置的数据填充上baos.write(start,0,start.length);baos.write(item.getValue(),0,item.getValue().length);baos.write(end,0,end.length);//最后把so保存起来sodata=baos.toByteArray();}}writeFile(baos.toByteArray(),savepath);}}
最后IDA打开一下生成的so看看结果:

最后我们将libcrypt.so以及libcrack.so都直接用unidbg跑一次,然后下面贴上IDA查看这两个so的结果。
Libcrypt.so的IDA结果如下:

Libcrack.so的IDA结果如下:

最后贴上三个例子的下载地址:
https://pan.baidu.com/s/1wAgjruBJe-a9T2Y63bKH7w
密码:4qsj
贴上unidbg的字符串反混淆例子:
https://github.com/dqzg12300/unidbg_tools.git

看雪ID:misskings
https://bbs.pediy.com/user-home-659397.htm
*本文由看雪论坛 misskings 原创,转载请注明来自看雪社区。

# 往期推荐


球分享
球点赞
球在看

点击“阅读原文”,了解更多!
[广告]赞助链接:
关注数据与安全,洞悉企业级服务市场:https://www.ijiandao.com/
让资讯触达的更精准有趣:https://www.0xu.cn/
 关注KnowSafe微信公众号
随时掌握互联网精彩
- 微软设计团队再次更新Microsoft Office系列组件图标 设计理念为流动性
- 国产编程语言MoonBit正式被Github收录!两年核心用户数突破3万
- 在线音频转换器:将您的音频文件转换为MP3、WAV、FLAC、OGG等格式
- 雷军:小米 13 暂无做半代升级版本计划;微软放宽 Bing 搜索引擎使用限制;.NET 8 发布首个预览版本|极客头条
- 车服务平台-ios版本分析
- 【京麒】听说,网络安全江湖一武林秘籍突然现世?
- 月费 19 美元,GitHub Copilot 企业版上线,你乐意买单吗?
- 时代落在英伟达身上的是粒什么沙,国产GPU的机会又在哪?
- 一加Ace Pro:澎湃性能,游戏体验不将就
- 华为轮值董事长郭平新年致辞:前行不辍,未来可期
- 诸子云 | 2020评优:最佳项目候选展播及投票
- Redmi Note 9 Pro:新一代小金刚,全面升级